Friday, April 12, 2024

TOGETHER ALBUM/SIMPLE STORIES


Hello, friends! Nicole here with a friendship album I created for my best friend, Mischelle. We have been friends for a little over 25 years. Our friendship has always been so easy, and we mesh so well together. I created many albums for my family and a few friends, but I came to the realization, I never made Mischelle an album. So… I made it, and I just love it.

I decorated the inside of the book with a sheet of 6x8 patterned paper and added a tag, die cuts and the butterfly foam square. I kept it simple.
I love the flow of this two-page spread with all the beautiful cluster of embellishments. Playing with embellishments…creating layers makes my heart happy.
I backed the yellow chipboard frame with patterned paper and mounted it to the striped insert page using foam squares to add dimension and then added the picture and embellishments. I like that it looks kind of like a shadow box. 
Notice how I tried to pull colors from the photos to use as the color theme of the page!? My friend, Mischelle always has a different color hair color when I visit, and I LOVE it. 
This is one of my favorite pages from this album. I love the soft colors and the beautiful flowers and butterflies. 
For those who look forward to my monthly albums… you know I always like to do something fun with the chipboard pages from the SNAP albums! I kept this simple using the rub-ons for the center of the page and the tab.
I adore this page with the cluster of embellishments at the bottom with the bird. Also, I placed the tab sticker at the top and tore some washi tape to go across the top of the photo.
When we are together…I always take a photo. I don’t care if we are wearing makeup or not because one day… We will both look back at these photos and wonder where did the time go? Are you ready to make a friendship album, yet?

I hope I inspired you today with my colorful, friendship album. I plan on giving this album to my friend when I visit her in May. Thank you so much for visiting today. 

-Nic

Wednesday, April 10, 2024

LET'S GETAWAY/SIMPLE STORIES

Hello, friends! I'm sharing this fun album I  created for my sister. She just recently took a trip to Hawaii and I'm just jealous... but I enjoyed looking through her beautiful pictures...and making this album for her using Simple Stories' Just Beachy collection. 


I had fun making this cover. I overlapped two 6x8 patterned papers, tucked the photo behind the chipboard frame and then added a few chipboard stickers and the decorative brad. I really love these flip books! 

This spread is super cute, isn't it? I cut two patterned papers down to mix and match them...and added the Chipboard frame and embellishments. Super simple, but the embellishments are so perfect! I added the pocket page for journaling and used up some really cute die cuts. Isn't this adorable!! 


Sometimes, a little goes a long way... you do not need to go crazy with embellishments for every page... The chipboard frames and die cuts along with the 6x8 paper pad makes these albums so easy to make in a SNAP. 


I had fun with the cut apart cards... I thought it would make a fun book marker insert... Notice how I used some of the die cuts and decorative brad? FUN! Don't forget to decorate your journaling page, too! They don't need to be original. 


I used a few rub-ons for the bottom journaling card to make it pop... and I can't get enough of the Decorative Brads. So fun.

I think this page just screams Hawaii! Notice how I placed the flip-flops die over the "beach" foam sticker!  And the little strip of washi... It's the little things that makes a page POP. 

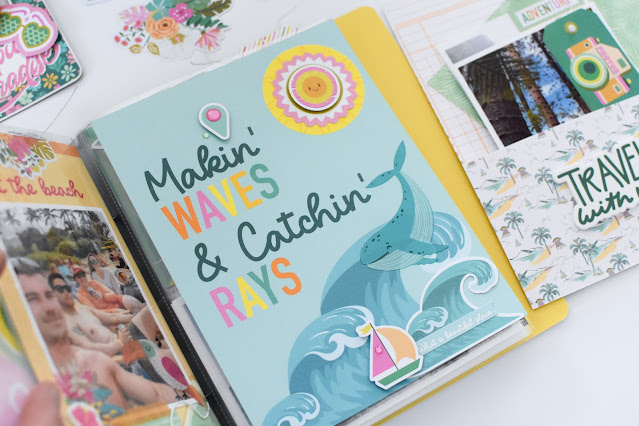
I like using a journaling card behind one of the double chipboard frames along with a photo. It's super fun! Isn't that whale cute! Seriously, this collection has the best embellishments!! 


I had fun playing with all the flower die cuts on this spread! I used foam squares to pop them up to add dimension... Isn't this beautiful. 

I added a travel notebook page just for fun... can you spot all of the beautiful rub-ons? FUN!


Here's a fun pocket page. Loving the clusters in each pocket!

I cut a 6x8 paper down in half and added strong adhesive tape along the sides and bottom to create a pocket. Next, I punched holes through the tags and added them onto the photos for fun.


I decorated this 6x8 page using a variety of embellishments. 


Here are a few more pocket pages. I wanted to add a few journaling spots so my sister can journal about her adventures!


I hope I inspired you today! Are you ready to document your adventures with this beautiful collection?You can purchase the Just Beachy collection at A Cherry on Top! Click here to start shopping through my affiliate link. The price you pay will not be higher...I may receive compensation for the referral.  you for visiting and I hope you have a fantastic week!


-Nic

Friday, March 29, 2024

WE JUST CLICK/TRINITY STAMPS

Good morning, friends! Nicole here. I'm so excited to be back on this fabulous team. Today, I'm sharing a fun layout I created using the Rainbow Shaker Die Set. Initially, I was going to make a rainbow for a layout and then I thought I'd challenge myself to use the dies a different way, and oh, it was fun!

To begin, I used my Sizzix machine to cut a variety of rainbows from different shades of blue cardstock.
I glued all of the rainbows to cover the top half of the layout. The rainbow at the top left-side of the layout looked off to me so I cut another rainbow to make it into a cover so it looked better. Also, the "we just click" sentiment on the die cut cloud is from the Picture This Stamp Set.
After I was finished embellishing the top-half of the layout, I felt like the bottom was missing something. It looked too plain so I cut another rainbow die and placed it at the bottom and embellished it with a few butterflies etc. If you look closely, you will see the beautiful Sea Glass Twinkle Stardust Rhinestones. They are sooooo pretty!!!
Here is some close-up images of how I used the Rainbow Shaker Die Set and the Mermazing Stamps and dies. I wanted to make a rock for the crabby, but didn't want to color it with markers. Instead, I stamped it over the map paper and cut it out to use as embellishments for the layout. Super easy! What do you think? Neat, right!?
I hope I inspired you today! I love playing with stamps and metal dies and I cannot wait to share my other layouts with you. Thank you so much for visiting today! Click here, to shop through my affiliate link. You will not be charged more for your purchase, however, I may be compensated as a referral for your order. I hope you have a fantastic weekend.
-Nic


-Nic